How to Check If Your Computer Already Has Built-in WiFi
Before buying any adapter, the first step is checking whether your computer already has a wireless card. Many laptops made since 2015 and some high-end desktops include built-in WiFi. A 30-second check saves you from buying hardware you do not need.
Check for Built-in WiFi on Windows 11
Windows 11 makes it straightforward to verify if a wireless adapter is present.
- Right-click the Start button (or press Windows key + X) and select Device Manager.
- In the Device Manager window, find and double-click Network adapters to expand the list.
- Look for any entry containing “Wi-Fi,” “Wireless,” “WLAN,” or “802.11” in its name. Common labels include “Intel Wi-Fi 6 AX201,” “Realtek RTL8821CE Wireless LAN,” or “MediaTek Wi-Fi 6 MT7921.”
- If you see one of these entries, your PC has a built-in wireless adapter. Right-click it and select Properties to check the driver status. A message saying “This device is working properly” confirms the hardware is functional.
If the only entries under Network adapters are things like “Realtek PCIe GbE Family Controller” or “Bluetooth Device,” your PC does not have WiFi hardware and needs an adapter.
You can also check via Settings > Network & internet. If a Wi-Fi tab appears in the left sidebar with a toggle switch, your system has a wireless adapter installed. If Wi-Fi is missing from this menu entirely, no adapter is present.
Check for Built-in WiFi on Mac
Apple desktops and laptops have included built-in WiFi since the early 2000s, but it is still worth verifying.
- Look at the menu bar at the top of the screen. If you see the WiFi icon (a fan-shaped symbol), your Mac has a wireless adapter.
- For detailed confirmation: hold the Option key and click the Apple logo in the top-left corner, then select System Information.
- In the System Information window, select Network in the left sidebar, then click Wi-Fi.
- If adapter details appear (card type, firmware version, MAC address, supported channels), your Mac has built-in WiFi. An empty or missing Wi-Fi entry means no wireless hardware is present.
What If Your Built-in WiFi Is Broken?
Built-in adapters can fail, especially on laptops older than four years. Signs of a failing internal WiFi card include frequent disconnections, speeds much slower than other devices on the same network, or the adapter disappearing from Device Manager after a Windows update. In these cases, a USB WiFi adapter is the cheapest fix: it bypasses the broken internal card entirely and costs less than a motherboard repair.
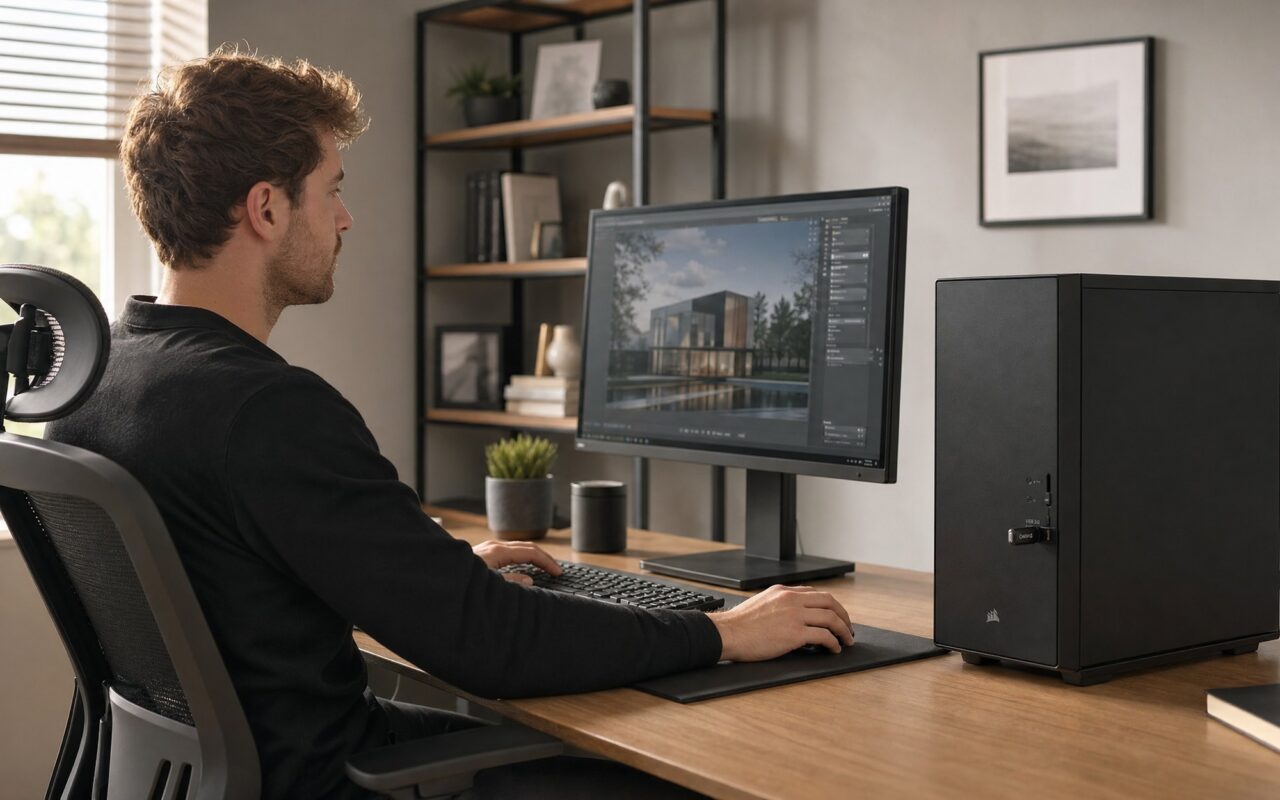
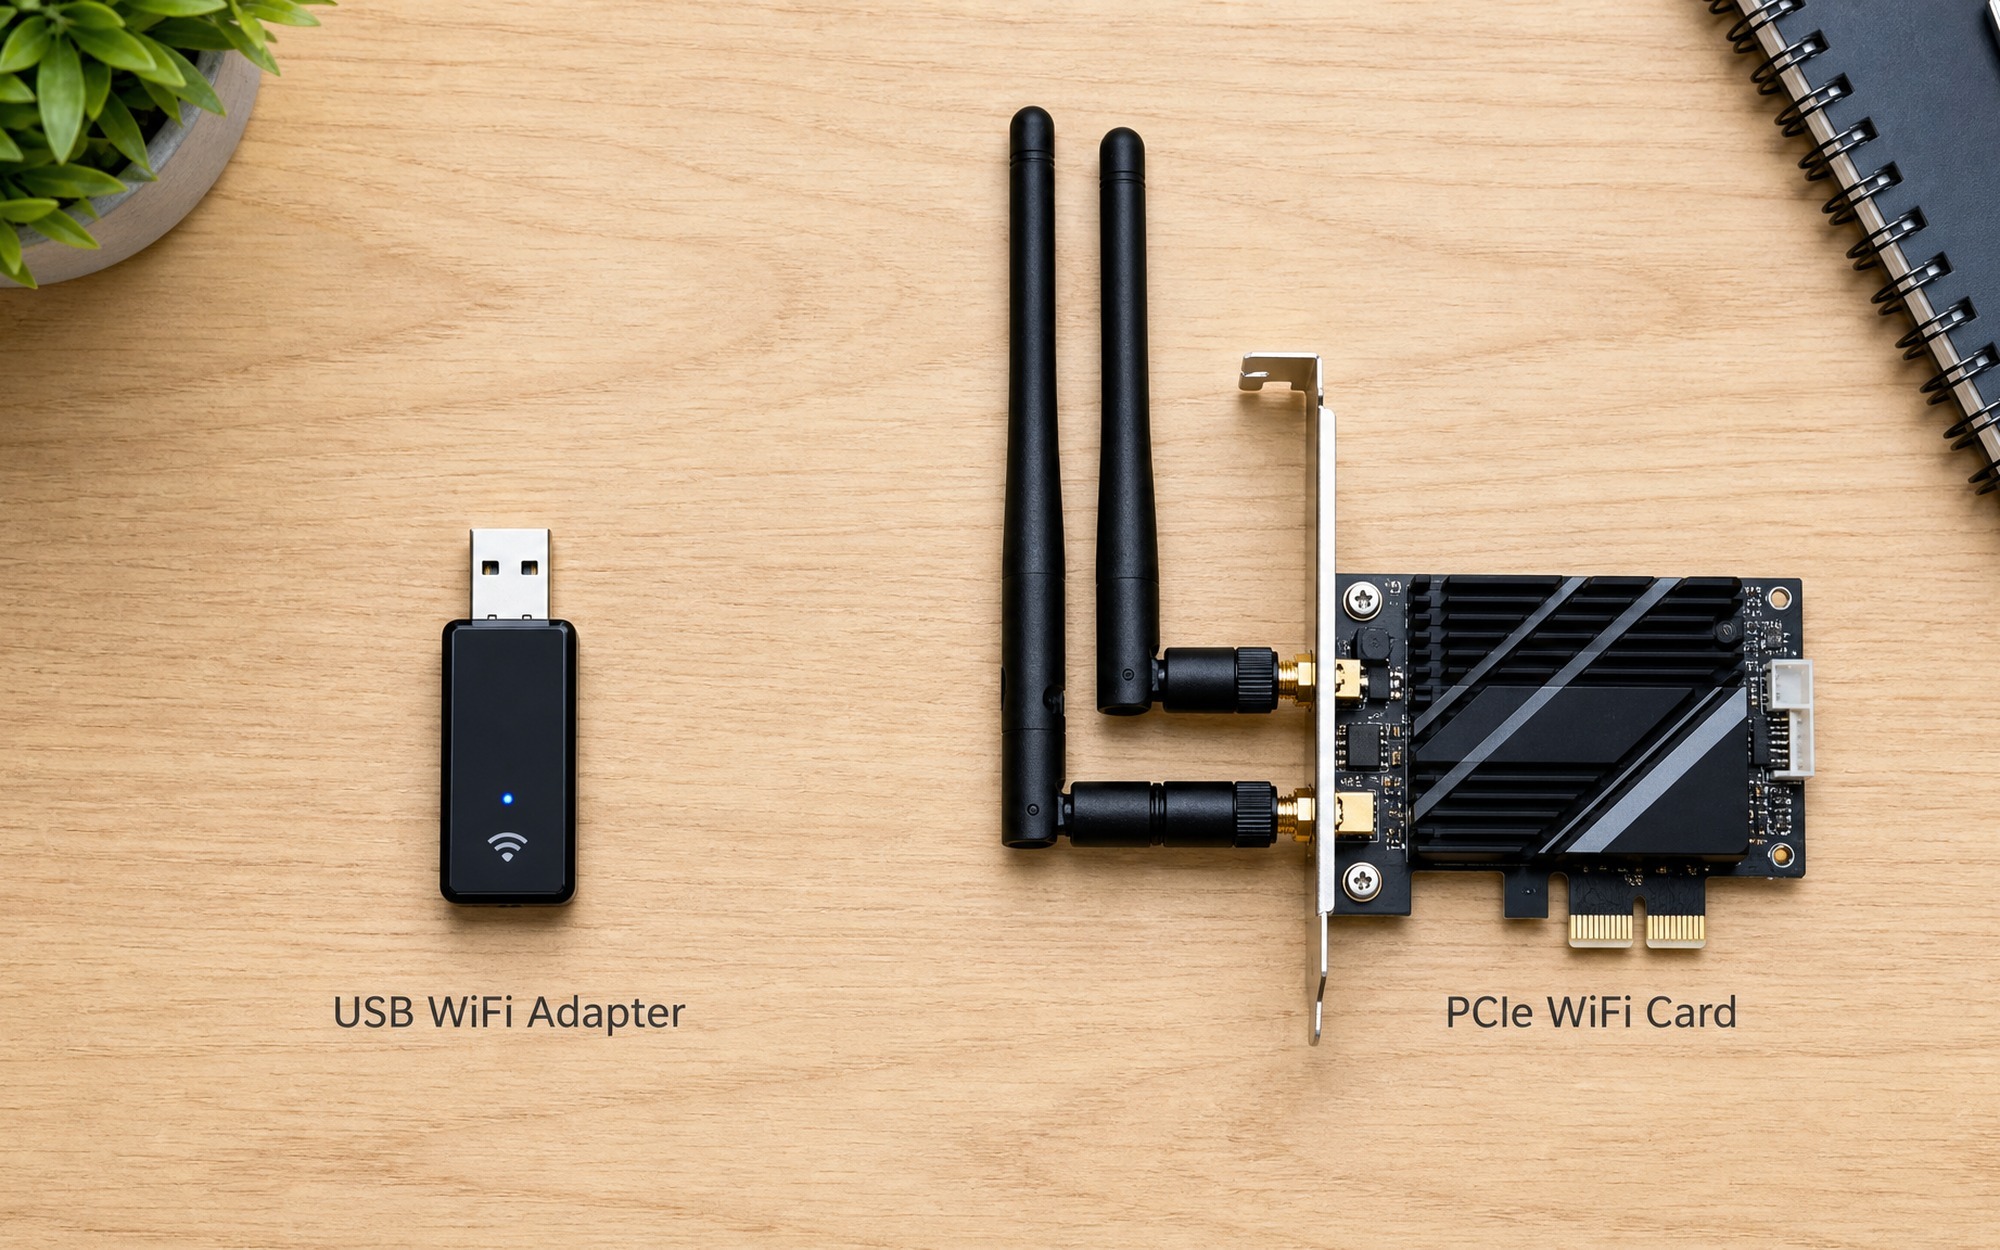
USB WiFi Adapter vs PCIe Wireless Card: Which One Should You Buy?
Once you have confirmed your computer needs wireless hardware, the next decision is between a USB adapter and a PCIe card. They serve the same purpose but work differently, and choosing the wrong type for your situation leads to frustration.
| Factor | USB WiFi Adapter | PCIe WiFi Card |
|---|---|---|
| Installation | Plug into USB port, driver auto-installs | Open case, insert into PCIe slot, attach antennas |
| Speed | Up to 1.2 Gbps (WiFi 6) or 2.4 Gbps (WiFi 6E USB) | Up to 5.8 Gbps (WiFi 7) with external antennas |
| Range | Limited by small internal antenna | Excellent: external antennas can be repositioned |
| Portability | Move between computers easily | Fixed inside one desktop |
| Price | $15 — $40 (WiFi 5 to WiFi 6E) | $25 — $60 (WiFi 6 to WiFi 7) |
| Best For | Laptops, quick fixes, multi-computer use | Desktop gaming, streaming, permanent upgrades |
| WiFi Standards | WiFi 5, 6, and 6E (USB 3.0 required for 6E) | WiFi 6, 6E, and 7 (PCIe 3.0 x1 or higher) |
| Driver Setup | Automatic on Windows 11; manual on older Windows | Usually requires driver download from manufacturer site |
Which to pick: For most home users browsing, streaming, and working remotely, a USB WiFi 6 adapter in the $20 to $35 range is the right choice. Installation takes under a minute, and the speed ceiling of 600 to 1200 Mbps exceeds what most home internet plans deliver. For desktop users who game online, transfer large files over the local network, or have Gigabit internet or faster, a PCIe WiFi 6E or WiFi 7 card is worth the extra installation effort. The external antennas make a measurable difference: in real-world testing, PCIe cards consistently deliver 20 to 40 percent higher throughput at the same distance from the router compared to USB adapters of the same WiFi generation.
Method 1: How to Connect Your PC to WiFi Using a USB Adapter
A USB WiFi adapter is the simplest way to add wireless to any computer. The entire process takes under two minutes on Windows 11, and the adapter can be moved between computers as needed.
Step 1: Choose the Right USB Adapter
Not all USB adapters are equal. When shopping, prioritize these specs:
- WiFi standard: Minimum WiFi 6 (802.11ax) for a modern adapter that will stay compatible with routers for years. Avoid WiFi 5 (802.11ac) adapters unless the budget is under $15.
- USB version: USB 3.0 or higher (the blue connector inside the plug). USB 2.0 caps at 480 Mbps, throttling even a mid-range WiFi 6 adapter.
- Dual-band support: 2.4 GHz for range through walls, 5 GHz for speed. Many modern adapters add 6 GHz (tri-band) for WiFi 6E compatibility.
- Brand reliability: TP-Link, Netgear, ASUS, and D-Link maintain current Windows 11 drivers. No-name adapters often use generic Realtek chips with outdated driver packages.
Price range: a solid WiFi 6 USB adapter costs $20 to $35. Spending less than $15 usually means getting a WiFi 5 adapter with a USB 2.0 interface.
Step 2: Plug In the Adapter
Insert the USB adapter into an available USB port. For desktops, use a USB port on the back of the case connected directly to the motherboard. Front-panel USB ports route through an internal cable that can introduce interference and occasionally under-power the adapter. If you must use a front port, USB 3.0 (blue) ports are more reliable than USB 2.0 (black) ports.
On laptops, any USB port works, but the adapter will protrude from the side. Compact “nano” adapters that sit nearly flush with the laptop body are available for $20 to $30 if the protruding size is an issue.
Step 3: Install the Driver
Windows 11 automatically detects most USB WiFi adapters and installs the driver within 15 to 30 seconds. A notification appears in the bottom-right corner: “Setting up a device.” Once it changes to “Your device is ready,” the driver installation is complete.
If Windows does not automatically install the driver:
- Open Device Manager (right-click Start > Device Manager).
- Look for an entry under Other devices with a yellow warning triangle. It may be labeled “802.11n USB Wireless LAN” or “Unknown device.”
- Right-click it and select Update driver > Browse my computer for drivers > Let me pick from a list. If Windows has a compatible driver, it appears here.
- If no driver is found, go to the adapter manufacturer’s support page on another device, download the Windows 11 driver, transfer it via USB drive, and install it manually.
Some adapters include a driver CD. Since most modern desktops lack optical drives, download the latest driver from the manufacturer’s website instead. The CD version is almost always outdated.
Step 4: Connect to Your WiFi Network
- Click the network icon (globe or computer screen) in the system tray at the bottom-right of the taskbar.
- Click the arrow or caret next to the Wi-Fi icon to expand the list of available networks.
- Find your network name (SSID), click it, and select Connect.
- Enter your WiFi password and click Next.
- Windows asks if you want to make your PC discoverable on the network. Select Yes for home networks, No for public networks (coffee shops, airports).
Once connected, the network icon changes to the familiar Wi-Fi signal bars. Open a browser and load any website to confirm the connection is working.
Method 2: How to Install a PCIe WiFi Card in Your Desktop
A PCIe WiFi card is a permanent internal upgrade for desktop PCs. Installation takes 10 to 20 minutes and requires a Phillips-head screwdriver, but the result is a desktop with the same wireless capability as a high-end laptop.
Step 1: Choose a Compatible PCIe WiFi Card
PCIe WiFi cards use a PCIe x1 slot, the short slot found on every motherboard made in the last 15 years. Before buying, confirm:
- Slot availability: Open the case and verify an empty PCIe x1 slot is accessible. If a large GPU blocks nearby slots, a PCIe x1 extension cable ($8 to $12) can reposition the card.
- WiFi standard: WiFi 6E and WiFi 7 cards are forward-compatible with older PCIe slots. A WiFi 7 card in a PCIe 3.0 slot still works, just at the slot’s maximum bandwidth.
- Bluetooth included: Most PCIe WiFi cards include Bluetooth 5.3 or 5.4, which connects to a USB 2.0 header on the motherboard via a small cable included in the box. This is useful for wireless headphones, keyboards, and file transfers.
- Antenna type: Cards with a cabled external antenna base (placed on the desk) outperform cards with antennas screwed directly to the back of the case because the desk placement reduces interference from the metal chassis.
Recommended chipsets: Intel AX210 (WiFi 6E), Intel BE200 (WiFi 7), MediaTek MT7925 (WiFi 7). These are the chips used inside name-brand cards from TP-Link, ASUS, and Gigabyte.
Step 2: Prepare Your Desktop
- Shut down the computer completely. Do not use Sleep or Hibernate.
- Switch off the power supply using the rocker switch on the back of the case.
- Unplug the power cable from the wall outlet.
- Press and hold the power button for 5 seconds to discharge any remaining power in the capacitors.
- Open the side panel. Most cases use two thumbscrews at the back or a sliding latch.
Touch a metal part of the case before handling any components to discharge static electricity. Avoid working on carpet if possible.
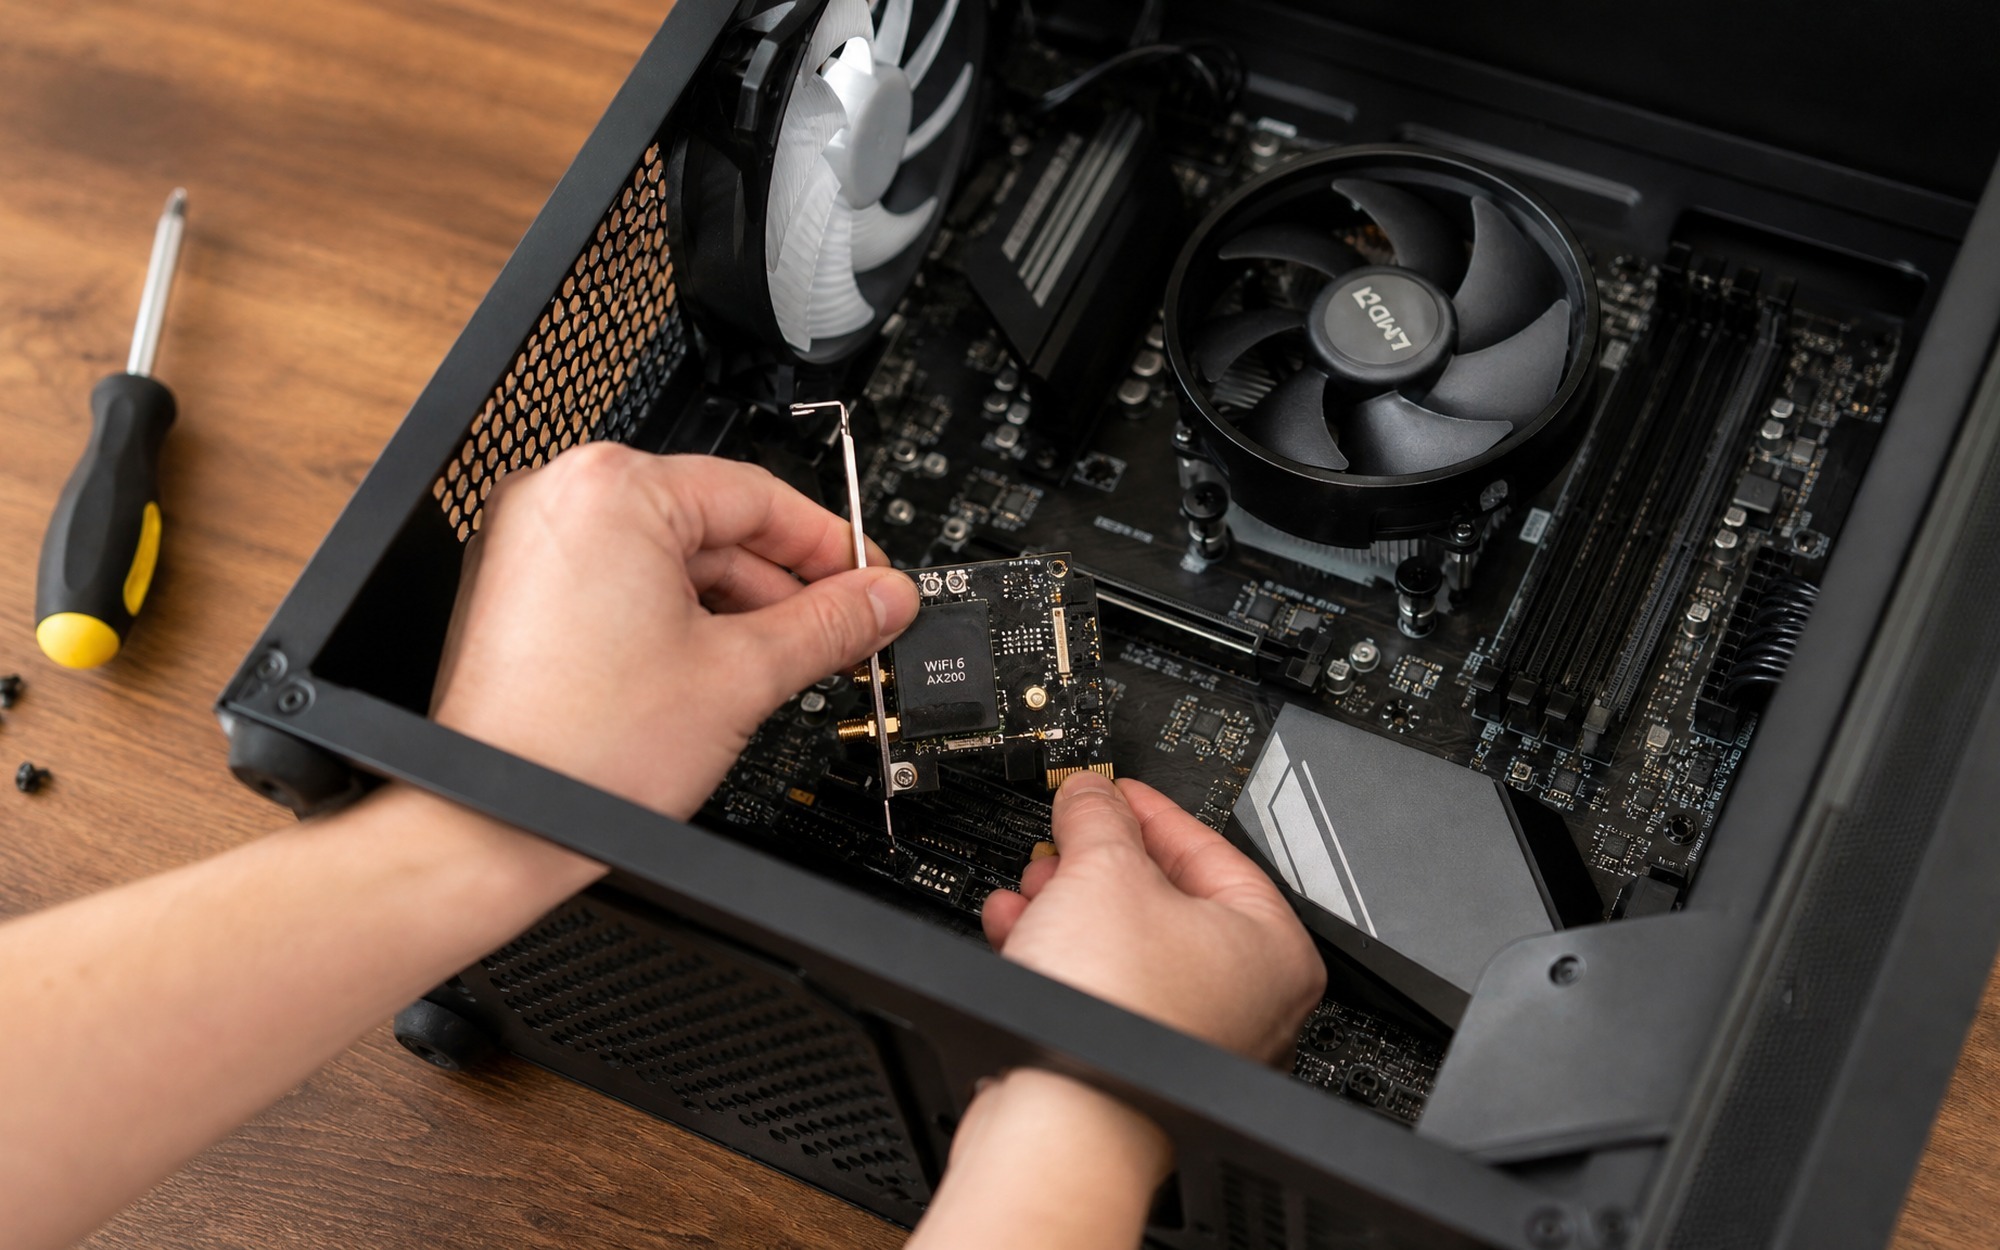
Step 3: Install the Card
- Locate an empty PCIe x1 slot on the motherboard. These are the short slots, usually 25 mm long, labeled “PCIe x1” on the board.
- Remove the corresponding expansion slot cover from the back of the case. It is held by a single screw or a tool-free latch.
- Align the card’s connector with the PCIe slot and press down firmly and evenly until the card clicks into place. The gold contacts should be fully seated in the slot.
- Secure the card to the case using the screw from Step 2.
- If the card includes Bluetooth, connect the internal USB cable from the card to a USB 2.0 header on the motherboard. The header is labeled “USB” and has 9 pins in a 5×2 arrangement with one pin missing for orientation.
- Attach the external antennas. Screw them onto the gold RP-SMA connectors on the card’s bracket. If the card uses a cabled antenna base, connect the cables to the card, then place the antenna base on your desk with a clear line of sight to the router.
Step 4: Close the Case and Install Drivers
- Replace the side panel and reconnect the power cable.
- Turn on the power supply switch and boot the computer.
- Windows 11 may recognize the card and install a basic driver, but the generic driver rarely enables full WiFi 6E or WiFi 7 speeds. Download the latest driver from the card manufacturer’s website.
- For Intel-based cards, download the Intel Driver & Support Assistant, which automatically detects the AX210 or BE200 chipset and installs the correct driver.
- Restart after driver installation, then connect to your WiFi network following the same steps as Method 1, Step 4.
WiFi Adapter Not Working? Common Problems and How to Fix Them
A new WiFi adapter should work within minutes, but several common issues can block the connection. Here are the fixes that resolve the vast majority of problems, ordered from most to least likely.
Problem 1: Driver Not Installed or Outdated
This is the number one reason a new adapter fails. The adapter appears in Device Manager with a yellow warning triangle under “Other devices” or “Network adapters,” or does not appear at all.
Fix: Open Device Manager, find the adapter, right-click, and select Update driver > Search automatically for drivers. If Windows cannot find a driver, visit the manufacturer’s support page (TP-Link, Netgear, ASUS, etc.) and download the driver for your specific adapter model and Windows version. Install it, then restart. For Intel-based PCIe cards (AX210, BE200), use the Intel Driver & Support Assistant tool for automatic detection.
Problem 2: USB Port Power Delivery Issues
USB WiFi adapters draw power from the USB port, and not all ports deliver consistent power. Front-panel USB ports on desktops are particularly prone to this because the internal cable connecting them to the motherboard can degrade the signal.
Fix: Move the adapter to a USB port on the back of the desktop, directly on the motherboard. USB 3.0 ports (blue connector) deliver 900 mA compared to USB 2.0’s 500 mA, providing more stable power. If using a laptop, try every USB port; one may be on a different internal hub with better power delivery. If USB ports are not detecting any devices, our guide to fixing device recognition issues covers USB controller troubleshooting that applies to WiFi adapters as well.
Problem 3: Windows 11 Driver Signature Enforcement
Some budget adapters, particularly from lesser-known brands, use unsigned or outdated drivers that Windows 11 blocks by default for security reasons.
Fix: Temporarily disable driver signature enforcement. Hold Shift while clicking Restart from the Start menu. Navigate to Troubleshoot > Advanced options > Startup Settings > Restart. After reboot, press 7 (“Disable driver signature enforcement”). Install the driver, then restart normally. Driver signature enforcement re-enables on the next boot, so this is safe. The adapter should continue working after the restart.
Problem 4: Conflicting Network Adapters
If your PC has a built-in Ethernet port that was previously the primary connection, Windows may still be routing traffic through Ethernet even though the cable is unplugged. Similarly, an old or broken internal WiFi card can conflict with the new adapter.
Fix: Open Settings > Network & internet > Advanced network settings. Under “Network adapters,” click the three dots next to any Ethernet or old WiFi adapter and select Disable. Leave only your new WiFi adapter enabled. Restart the PC and try connecting again.
Problem 5: WiFi Network Not Showing Up
The adapter is installed and drivers are working, but your home network does not appear in the list of available networks.
Fix: First, verify the network is broadcasting by checking if your phone sees it. If the phone sees it but the PC does not, the issue is the WiFi band: older and budget adapters only support 2.4 GHz. If your router is set to 5 GHz only (or 6 GHz only for WiFi 6E routers), the adapter cannot see it. Log into your router settings and enable 2.4 GHz broadcasting, or use a dual-band adapter. Also check that the router’s SSID broadcast is not hidden: hidden networks require manual entry of the exact network name.
Problem 6: Adapter Is Defective
If the adapter fails on multiple computers after following all troubleshooting steps, the hardware itself is likely faulty.
Fix: Test the adapter on a second computer. If it fails there too, return it for a replacement. This is most common with adapters under $10, whose failure rate is noticeably higher than name-brand adapters in the $20+ range. When returning, buy the replacement from a brand with downloadable driver support (TP-Link, Netgear, ASUS, D-Link) rather than a no-name alternative.
Ethernet Cable vs WiFi for Home Office: Which Connection Should You Use?
Many people working from home face this exact setup question: should the work computer use WiFi for convenience, or ethernet for reliability? The answer depends on what kind of work you do and where your router is located.
Speed Comparison
| Connection | Typical Real-World Speed | Theoretical Max |
|---|---|---|
| Ethernet (Gigabit) | 900-950 Mbps | 1,000 Mbps |
| Ethernet (2.5 GbE) | 2,300-2,450 Mbps | 2,500 Mbps |
| WiFi 6 (5 GHz) | 500-800 Mbps | 1,200 Mbps |
| WiFi 6E (6 GHz) | 800-1,500 Mbps | 2,400 Mbps |
| WiFi 7 (6 GHz) | 1,500-4,000 Mbps | 5,800 Mbps |
Ethernet consistently delivers close to its rated speed regardless of distance (up to 100 meters). WiFi speeds drop as distance from the router increases and as walls, floors, and neighboring networks introduce interference. A WiFi 6 connection that delivers 800 Mbps at 10 feet may drop to 200 Mbps at 30 feet with two walls in between.
Latency and Reliability
Ethernet: Sub-1ms latency with zero packet loss under normal conditions. This matters for real-time applications: video calls, VoIP, remote desktop, and competitive gaming where even 50ms of jitter causes visible stutter.
WiFi: 3ms to 15ms latency under ideal conditions, spiking to 50ms+ when the channel is congested. WiFi is a shared medium; every device on the same channel (including your neighbors’ devices if you live in an apartment) competes for airtime.
For Zoom, Teams, and Google Meet calls specifically, ethernet eliminates the unexplained audio dropouts, frozen video frames, and “your connection is unstable” warnings that plague WiFi connections. One pattern that surfaces consistently in remote worker forums: switching from WiFi to ethernet resolves roughly 80 percent of recurring call quality complaints without any other changes to the setup.
When to Use Each
Use Ethernet when:
– Your desk is in the same room as the router (or one room away with a flat ethernet cable running along baseboards)
– You spend 3+ hours per day on video calls
– You regularly transfer large files (video projects, datasets, backups)
– You play competitive online games where latency matters
– You have a Gigabit internet plan and want your full paid speed
Use WiFi when:
– Running an ethernet cable would cross hallways, staircases, or doorways creating a trip hazard
– Your work is primarily asynchronous: email, documents, spreadsheets, and browser-based tools
– You move between rooms throughout the day with a laptop
– You rent and cannot drill holes or run cables through walls
The practical middle ground: a powerline adapter uses your home’s electrical wiring to carry the network signal. Plug one unit into an outlet near the router and connect it via ethernet, then plug the second unit near your desk and connect your computer via ethernet. Powerline adds 2ms to 5ms of latency and typically delivers 100 to 500 Mbps depending on your home’s wiring quality. It is not as fast as direct ethernet, but it is more stable than WiFi for video calls.
WiFi Adapter Recommendations by Use Case (2026)
Rather than a generic “best adapter” list, here are the right picks for specific needs. All recommendations use chipsets with active Windows 11 driver support as of 2026.
Best Budget USB Adapter: TP-Link Archer TX20U Plus
A WiFi 6 USB adapter with a folding antenna for $20 to $25. See the official product page for full specifications. The AX1800 rating (600 Mbps on 2.4 GHz, 1200 Mbps on 5 GHz) exceeds what most home internet plans deliver. The compact design works on both desktops and laptops without blocking adjacent ports.
Best Mid-Range USB Adapter: Netgear Nighthawk A8000
WiFi 6E support with the 6 GHz band for $40 to $50. See the Nighthawk A8000 product page for detailed specs. The 6 GHz band is the key upgrade: it is less congested than 5 GHz because fewer devices use it, which means more consistent speeds in apartment buildings and dense neighborhoods. Requires a WiFi 6E router to use the 6 GHz band.
Best PCIe Card for Gaming: ASUS PCE-AX58BT
An Intel AX210-based WiFi 6E card with a cabled external antenna base for $35 to $45. The antenna base can be placed on top of the desk for optimal signal positioning. Includes Bluetooth 5.3. The Intel chipset guarantees ongoing driver updates through Intel’s support channel rather than relying on ASUS to release updates.
Best PCIe Card for Maximum Speed: Gigabyte GC-WIFI7
A WiFi 7 card using the Intel BE200 chipset for $50 to $60. Supports 320 MHz channel width on the 6 GHz band, Multi-Link Operation (MLO) for simultaneous 5 GHz and 6 GHz connections, and 4K QAM modulation. Real-world throughput on a WiFi 7 router reaches 3 to 4 Gbps, exceeding Gigabit Ethernet. Requires Windows 11 24H2 or newer for full WiFi 7 feature support.
All four adapters use standard Windows driver models and receive automatic updates through Windows Update. No adapter-specific management software is required beyond the initial driver installation.
Key Takeaways
- Check first, buy second. A 30-second Device Manager check on Windows 11 or System Information check on Mac tells you whether you even need an adapter. Many computers made after 2018 already have built-in WiFi.
- USB for simplicity, PCIe for performance. A $20-$35 USB WiFi 6 adapter connects any computer to WiFi in under two minutes. A PCIe card takes 20 minutes to install but delivers faster speeds, better range, and supports WiFi 7 on desktop PCs.
- Drivers are the most common failure point. If a new adapter is not working, update the driver from the manufacturer’s website before assuming the hardware is defective. Windows 11’s automatic driver install works for most adapters but not all.
- Use the back USB ports on desktops. Front-panel USB ports often under-power WiFi adapters, causing disconnections and slow speeds. The back ports connect directly to the motherboard for stable power delivery.
- Ethernet for video calls, WiFi for flexibility. If your job involves hours of Zoom calls each day, running an ethernet cable is worth the minor inconvenience. For everyone else, a quality WiFi 6 or 6E adapter provides a connection stable enough that you will not notice the difference.
- USB adapters are true plug-and-play on Windows 11: connect to WiFi in under 60 seconds with zero technical skill
- PCIe WiFi 7 cards deliver up to 5.8 Gbps throughput, matching or exceeding Gigabit Ethernet speeds
- Both options cost $15 to $60 total, far cheaper than a new motherboard or computer with built-in WiFi
- Step-by-step instructions cover Windows 11, Windows 10, and macOS with screenshots for each method
- Works on any desktop or laptop with a USB port or PCIe slot, regardless of age or brand
- Budget USB adapters under $15 often use outdated WiFi 5 (802.11ac) chips with limited Windows 11 driver support
- PCIe installation requires opening the desktop case and basic familiarity with internal components
- USB adapters can physically block adjacent ports on laptops and compact desktops
- WiFi signal quality depends on router placement, wall materials, and interference from other networks
- Even WiFi 7 cannot match the sub-1ms latency of a direct ethernet connection for competitive gaming
Frequently Asked Questions
What is the best way to give a non-WiFi computer wireless internet access?
A USB WiFi adapter is the fastest and easiest way. Simply plug it into any available USB port, and Windows 11 will automatically detect and install the driver. Within two minutes, you can select your WiFi network, enter the password, and be online. For desktops where you want maximum speed and range, a PCIe WiFi card with external antennas is the better long-term solution. It supports the latest standards (WiFi 6E and WiFi 7), delivers higher throughput, and maintains a more stable connection thanks to larger antennas positioned outside the metal case.
USB WiFi adapter or PCIe wireless card: which should I buy?
Choose a USB adapter if you want a plug-and-play solution, need to use it across multiple computers, or have a laptop with a broken internal WiFi card. USB adapters cost $15 to $40 and work instantly. Choose a PCIe card if you have a desktop PC, want the fastest possible speeds (WiFi 6E or WiFi 7), or need a permanent, internal solution with better range. PCIe cards cost $25 to $60 and require opening the computer case to install. For most home users streaming video, browsing, and working remotely, a quality USB WiFi 6 adapter handles everything without the installation hassle.
How do I check if my PC has a built-in Wi-Fi adapter on Windows 11 or Mac?
On Windows 11: right-click the Start button and select Device Manager. Expand the Network Adapters section. Look for an entry with ‘Wi-Fi’, ‘Wireless’, ‘WLAN’, or ‘802.11’ in its name. If you see one, your PC has built-in WiFi. If you only see entries like ‘Ethernet’ or ‘Bluetooth’, your PC needs an adapter. Alternatively, open Settings > Network & internet > Wi-Fi. If the Wi-Fi toggle exists and can be turned on, your PC has a wireless adapter. On Mac: click the Apple menu, hold the Option key, and select System Information. Under Network > Wi-Fi, if you see adapter details (card type, MAC address, firmware version), your Mac has built-in WiFi. You can also look for the WiFi icon in the menu bar at the top of the screen.
Why won’t my new USB WiFi adapter work on my computer?
The most common reasons a new USB WiFi adapter fails to work are: (1) Missing or outdated driver — open Device Manager, find the adapter (it may appear under ‘Other devices’ with a yellow warning triangle), right-click and select Update driver, then choose Search automatically for drivers. (2) USB port issues — try a different USB port, preferably a USB 3.0 (blue) port on the back of the desktop directly connected to the motherboard. Front-panel USB ports can have power delivery issues. (3) Windows 11 driver signature enforcement — some budget adapters use unsigned drivers. Disable driver signature enforcement temporarily by restarting while holding Shift, then Troubleshoot > Advanced options > Startup Settings > Restart > press 7. (4) The adapter is defective — test it on another computer. If it works there, the issue is with your PC’s USB controller or Windows configuration. If it fails on both, the adapter itself is faulty and should be returned.
Should I use an ethernet cable or WiFi for my home office setup?
For home office work, ethernet is better for video calls and large file transfers because it provides consistent sub-1ms latency and full-duplex bandwidth that does not fluctuate with network congestion. WiFi 6 and 6E are good enough for email, document editing, web browsing, and most cloud-based work tools. The practical compromise: use ethernet for your primary work machine if the router is in the same room, and WiFi for laptops you move around the house. If running an ethernet cable across rooms is impractical, a WiFi 6 mesh system with a dedicated backhaul channel provides near-ethernet reliability without the physical cable. For Zoom, Teams, and VoIP calls specifically, ethernet eliminates the occasional packet loss that causes audio dropouts on congested WiFi networks.
Can I use my phone’s hotspot to connect my desktop computer to the internet without cable?
Yes, but with caveats. A smartphone hotspot shares cellular data over WiFi, which any WiFi-enabled computer can connect to. This works as a temporary solution when your main internet is down or when traveling. However, cellular data plans typically have data caps (15-50 GB before throttling), and hotspot speeds vary dramatically by location and network congestion. For a desktop without built-in WiFi, you would still need a USB WiFi adapter to receive the hotspot signal. USB tethering is a more reliable alternative: connect your phone to the desktop via USB cable, enable USB tethering in your phone’s settings (Android: Settings > Connections > Mobile Hotspot and Tethering > USB tethering; iPhone: Settings > Personal Hotspot > enable and connect via USB), and the desktop uses the phone’s internet through the USB connection without needing any WiFi hardware at all.